
Railroad Status Report, 4/4/03:
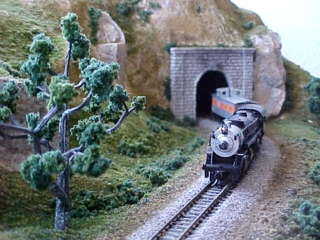
A long overdue update... Terrified at the prospect of making an error while landscaping my layout, I purchased the N-scale "Subterrain Scenery Kit" from Woodland Scenics. The ease with which this went together and with the great results have given me the confidence necessary to press forward with the layout. I've also been working on another structure, and I've made a modification to my layout. The next update will highlight the changes. Also, I've been collecting some additional rolling stock. The diorama should serve as a nice backdrop for photographing the new stuff.
Railroad Status Report, 7/16/02:
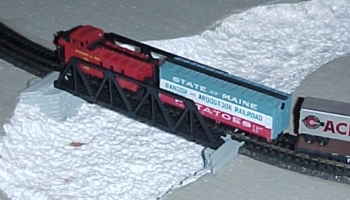
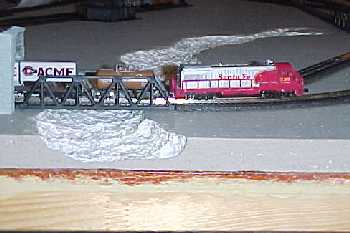
I finally figured out the installation of my brige abutments. Their overall size required two cuts each to fit my layout. After my coping saw failed to make much of a dent (literally and figuratively) in the resin casting, I finally succeeded in making a very smooth, straight cut with my miter box and back saw. Some careful cutting of foam and the abutments dropped right into place. The four additional pieces needed for the other two bridges are on order.
Railroad Status Report, 6/15/02:
Construction has begun on the riverbed. I decided not to gouge out the riverbed with a fork, spoon or knife, since that crude technique tends to cause little expanded polystyrene balls to go everywhere. Then, static cling causes them to show up in strange places throughout the house. So, I'm using a butane lighter, the kind sold in the barbeque and campfire section of variety stores. It causes the foam to collapse on itself and compress into a hard, easily paintable surface. This step will lead to the installation of bridge abutments. Once those are in place, I will be able to "permanently" secure the track in place, and begin wiring for blocks and switches.

Railroad Status Report, 6/6/02:
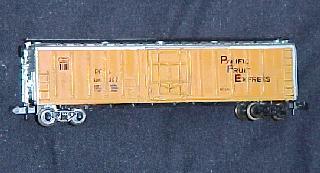
My first experiment in weathering rolling stock turned out well. Unfortunately, I didn't realize until too late that the truck bolster pins had been glued in place. So, they broke off while being removed. So far, attempts at drilling them out in order to replace them with Micro-Trains trucks and couplers have not been satisfactory. If I give up, this boxcar will become part of the scenery.
Railroad Status Report, 5/29/02:
I completed work on my first structure, the Blue Coal Depot, by Model Power. I'm very pleased with the way it turned out. Now, will it really fit (geographically) into my layout???
Railroad Status Report, 5/12/02:
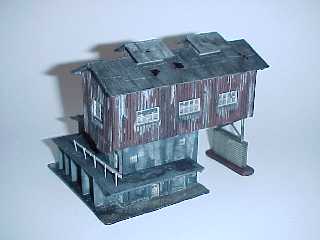
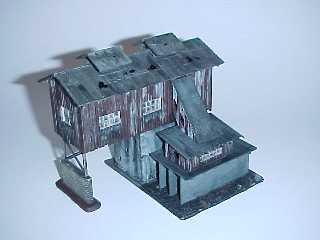
Rearranged web site, splitting it into several pages to speed loading. Added overhead photo of actual layout under construction. See links at bottom of page. I began working on my first structure, the Blue Coal Depot, by Model Power. The kit is fairly easy to build, but is molded in several shiny colors of plastic. I'm taking my time and using this model to begin developing my modeling and weathering skills.
The first step was to make several sub-assemblies and then give them a coat of Testors Dull Coat to remove the shine (sorry, no "before" pictures). I intended apply a wash consisting of a couple of drops of India Ink mixed in about a tablespoon of rubbing alcohol in order to make it look old and grimy. My bottle of India Ink contained only a solid black blob. I added about an ounce of Rubbing Alcohol to it, stirred into a goop, then covered it and shook it like crazy for several minutes. Next, I added a couple of drops to the alcohol to create the wash and started to work.
Initially, I was concerned that so many of the kit parts were dark. The model was model was molded with dark brown wood, grey roof and lower walls, and light tan doors, windows and ground. Since it is a coal depot, I figured everything would be filthy and have a coal dust coating. So, I was concerned that the India ink wash would end up making everything look the same.
It was a pleasant surprise when the alcohol sort of bleached the grey and brown pieces to look old and faded while, at the same time, the ink added the coal dust that I was looking for.
I have some more work to do on the sub-assemblies before combining the pieces into the completed model.
Railroad Status Report, 5/11/02:
Added overhead photo of actual layout (see link to layout page, below). The track is temporarily nailed in place atop the newly installed roadbed. Trains run smoothly without derailments (as long as the operator remembers to throw switches when necessary). For the first time in a long time, the train is not occupying a large portion of the kitchen. Partly because we're expecting a houseful of guests for Mother's Day, partly because I'm waiting for my new locomotive, and partly because I'm currently working on a structure and my first rolling stock weathering project, the layout is under the bed in the guest room. This location will be its home when not actually in use.
Railroad Status Report, 5/5/02:
Initial photos taken and web page built. The platform is built; 1" EPS foam board is installed and painted; Woodland Scenics Trackbed is glued in place; track is installed (but not glued) for test fitting; trains run smoothly.